on
IoC 컨테이너 2부
스프링 프레임워크 핵심기술을 공부하고 정리하는 포스트입니다.
ApplicationContext
ApplicationContext인터페이스는 BeanFactory처럼 IoC 컨테이너로서의 기능과 더불어 다양한 기능을 제공해주는 인터페이스이다.
다음 예제에서 ApplicationContext를 사용해 빈으로 등록하는 법을 알아보자.
Xml을 직접 만들어서 의존성 주입
먼저 BookService와 BookRepository를 만들다. BookService에서는 BookRepository를 사용하고 Setter를 작성한다.
package me.gracenam.springapplicationcontext;

public class BookRepository { }
package me.gracenam.springapplicationcontext;

public class BookService {

    BookRepository bookRepository;

    public void setBookRepository(BookRepository bookRepository) {
        this.bookRepository = bookRepository;
    }

}
이 상황에서 빈으로 등록하기 위해서는 스프링 빈 설정 파일을 만들어야 한다.
<?xml version="1.0" encoding="UTF-8"?>
<beans xmlns="http://www.springframework.org/schema/beans"
       xmlns:xsi="http://www.w3.org/2001/XMLSchema-instance"
       xmlns:context="http://www.springframework.org/schema/context"
       xsi:schemaLocation="http://www.springframework.org/schema/beans http://www.springframework.org/schema/beans/spring-beans.xsd http://www.springframework.org/schema/context https://www.springframework.org/schema/context/spring-context.xsd">

    <bean id="bookService"
          class="me.garcenam.springapplicationcontext.BookService"/>

    <bean id="bookRepository"
          class="me.gracenam.springapplicationcontext.BookRepository"/>

</beans>
id, class 외에도 scope, autowire 등의 속성들이 있다.
id의 경우 네이밍 컨벤션이 카멜 케이스를 쓴다. class에는 빈으로 등록할 클래스의 경로를 입력해주면 된다.
scope은 빈의 범위로 prototype, request, session, singleton이 있다. 여기서 singleton을 제외한 나머지는 모두 prototype이고 매번 새로만들거나(prototype) 리퀘스트 될 때마다 만들거나(request) 세션당 만드는(session) 것이다. 기본값은 singleton이다.
autowire는 autowire 모드에 대한 것인데 byName, byType, constructor, default, no가 있다. 기본값은 default이다.
이 외에도 많은 속성들이 있지만 여기서는 id와 class만 사용하도록 한다.
빈으로 두 가지를 등록을 했지만 이렇게만 할 경우에는 BookService가 BookRepository를 주입받지 못한다. 위 코드는 그냥 BookService를 만들고 끝이다.
<?xml version="1.0" encoding="UTF-8"?>
<beans xmlns="http://www.springframework.org/schema/beans"
       xmlns:xsi="http://www.w3.org/2001/XMLSchema-instance"
       xmlns:context="http://www.springframework.org/schema/context"
       xsi:schemaLocation="http://www.springframework.org/schema/beans http://www.springframework.org/schema/beans/spring-beans.xsd http://www.springframework.org/schema/context https://www.springframework.org/schema/context/spring-context.xsd">

    <bean id="bookService"
          class="me.garcenam.springapplicationcontext.BookService">
        <property name="bookRepository" ref="bookRepository" />
    </bean>

    <bean id="bookRepository"
          class="me.gracenam.springapplicationcontext.BookRepository"/>

</beans>
property를 이용해서 bookRepository를 추가해주는데, 이 때 name의 bookRepository는 BookService의 Setter에서 가져온 것이고, ref의 bookRepository는 다른 빈을 참조한다는 의미이다. 따라서 ref에는 Setter에 들어갈 수 있는 다른 빈의 id가 와야한다.
이렇게 빈을 설정했으면 빈 설정파일을 사용하는 ApplicationContext를 만들어야 한다.
package me.gracenam.springapplicationcontext;

import org.springframework.context.ApplicationContext;
import org.springframework.context.support.ClassPathXmlApplicationContext;

import java.util.Arrays;

public class DemoApplication {

    public static void main(String[] args) {
        ApplicationContext context = new ClassPathXmlApplicationContext("application.xml");
        String[] beanDefinitionNames = context.getBeanDefinitionNames();
        System.out.println(Arrays.toString(beanDefinitionNames));
        BookService bookService = (BookService) context.getBean("bookService");
        System.out.println(bookService.bookRepository != null);
    }

}
코드를 살펴보자.
ApplicationContext context = new ClassPathXmlApplicationContext("application.xml");
String[] beanDefinitionNames = context.getBeanDefinitionNames();
System.out.println(Arrays.toString(beanDefinitionNames));
ApplicationContext를 만들어서 빈 등록을 위해 작성한 빈 설정파일을 읽어왔다. 그리고 거기서 빈의 정의된 이름, 즉 각 빈의 id를 가져와서 배열에 담은 후 배열을 출력한다.
이렇게 할 경우 결과 값으로는 당연히 [bookService, bookRepository]가 출력되어야 할 것이다.
BookService bookService = (BookService) context.getBean("bookService");
System.out.println(bookService.bookRepository != null);
앞에서 가져온 빈들의 이름을 getBean으로 String으로 받아서 꺼낼 수 있다. 이 때 받아오는 빈의 이름(bookService)을 해당 타입(BookService)으로 받아오려면 타입 캐스팅을 해줘야한다. 그냥 가져 올 경우 Object 타입으로 된다.
bookService에 bookRepository가 의존성 주입이 되었는지 확인하기 위해 bookRepository가 null이 아닌지 확인하고 실행해보면 true가 나올 것이다. 즉, bookService는 xml 설정에 의해서 bookRepository라는 빈을 주입받은 것이다.
여기까지 살펴본 결과 이 방법은 굉장히 번거롭다는 것을 알 수 있다. 일일히 빈으로 등록을 해줘야한다는 단점이 있다.
그래서 등장한 것이 바로 context의 component scan이다.
Component Scan
마찬가지로 xml 파일을 생성한다.
<?xml version="1.0" encoding="UTF-8"?>
<beans xmlns="http://www.springframework.org/schema/beans"
       xmlns:xsi="http://www.w3.org/2001/XMLSchema-instance"
       xmlns:context="http://www.springframework.org/schema/context"
       xsi:schemaLocation="http://www.springframework.org/schema/beans http://www.springframework.org/schema/beans/spring-beans.xsd http://www.springframework.org/schema/context https://www.springframework.org/schema/context/spring-context.xsd">

    <context:component-scan base-package="me.gracenam.springapplicationcontext"/>

</beans>
Component Scan이 무슨 역할을 하는지 살펴보자.
<context:component-scan base-package="me.gracenam.springapplicationcontext"/>
간단하게 말해서, 이 패키지(me.gracenam.springapplicationcontext)로부터 빈을 스캔해서 등록하겠다는 말이다.
이렇게 사용하기 위해서는 @Component라는 애노테이션을 사용해야 한다.
package me.gracenam.springapplicationcontext;

import org.springframework.stereotype.Repository;

@Repository
public class BookRepository {

}
package me.gracenam.springapplicationcontext;

import org.springframework.beans.factory.annotation.Autowired;
import org.springframework.stereotype.Service;

@Service
public class BookService {

    @Autowired
    BookRepository bookRepository;

    public void setBookRepository(BookRepository bookRepository) {
        this.bookRepository = bookRepository;
    }

}
BookRepository와 BookService에 각각 @Repository와 @Service라는 애노테이션을 추가해줬다.
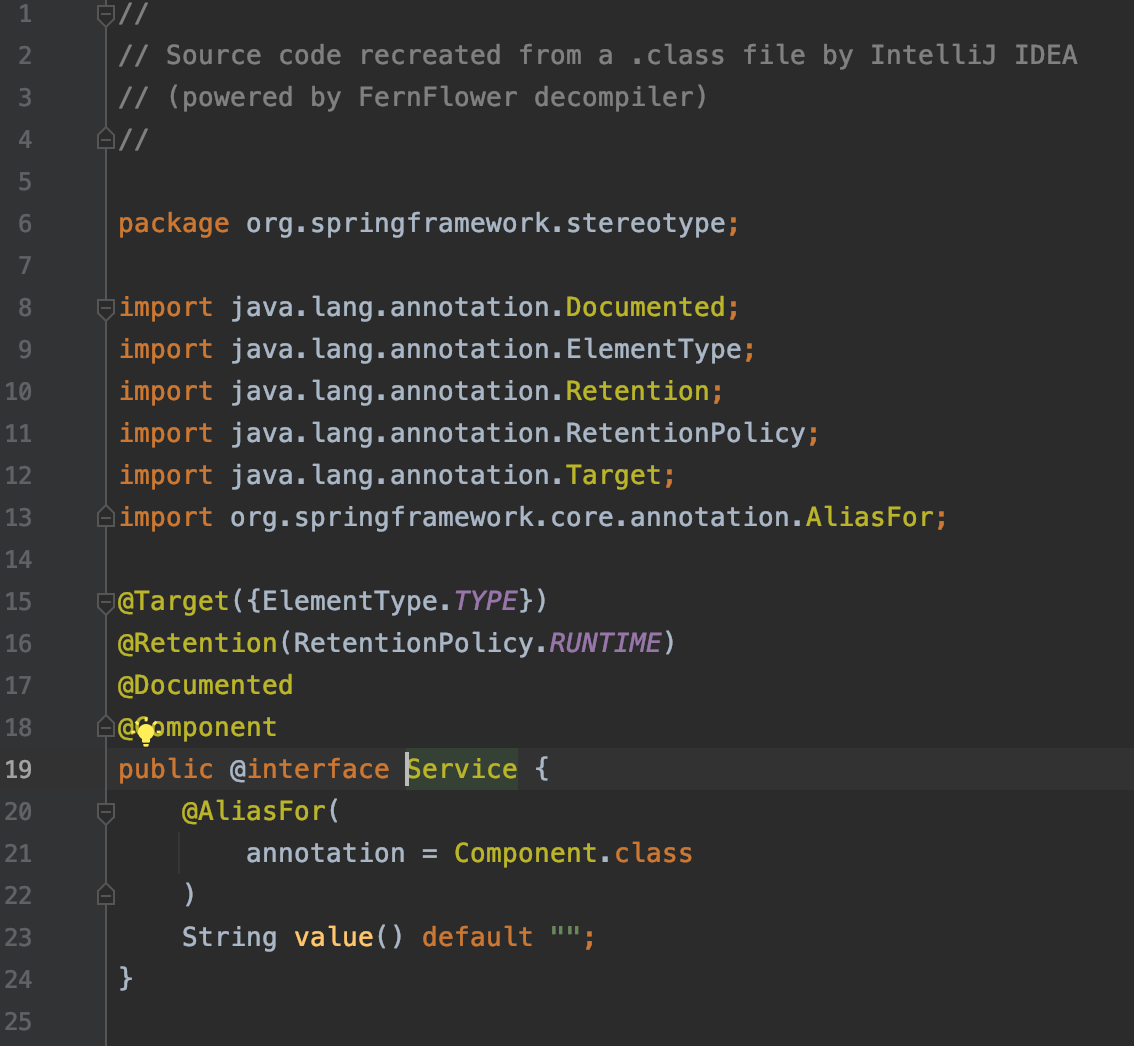
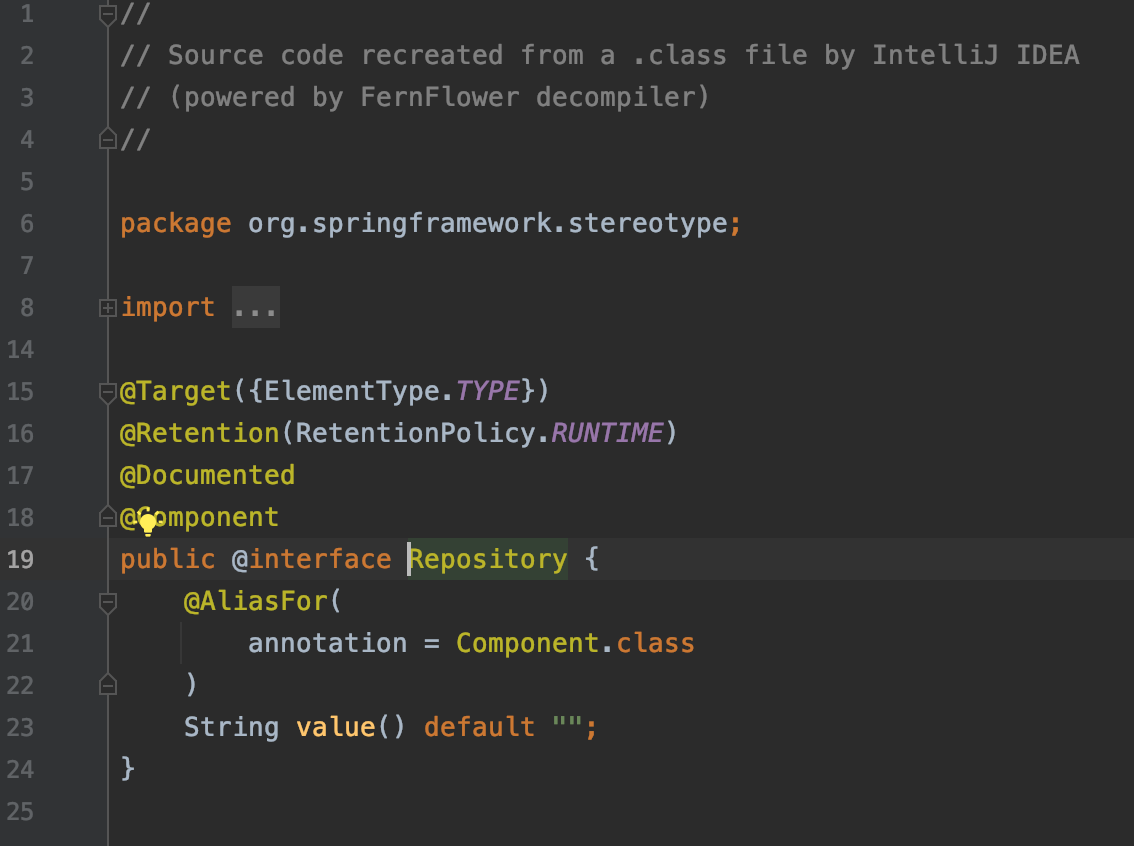
이 두 애노테이션은 모두 @Component라는 애노테이션을 확장받은 것들이다. 내부를 따라가면 모두 @Component가 붙어있는 것을 확인할 수 있다.
▶ @Service

▶ @Repository

이렇게 애노테이션을 추가하면 둘은 빈으로 등록이 되지만 의존성 주입은 안된다. 의존성 주입을 위해서는 @Autowired 혹은 @Injection을 사용해야한다. 여기서는 @Autowired를 사용했다.
이렇게 한 후에 애플리케이션을 실행해보면 xml을 읽어 들일 때 component scan이라는 기능을 사용해서 빈들을 패키지(me.gracenam.springapplicationcontext) 이하에서 애노테이션을 스캐닝을 해서 등록해준다. 이 기능은 스프링 2.5부터 가능했던 애노테이션 기반의 빈 등록 및 설정 방법이다.
그렇다면 빈 설정 파일은 xml이 아니라 자바로 만들 수 없을까? 라는 의문에서 등장한 것이 바로 Java 설정파일이다.
Java 설정 파일
자바 설정 파일은 별도의 xml 파일이 아닌 java 파일을 이용해서 빈 설정을 하는 것이다.
package me.gracenam.springapplicationcontext;

import org.springframework.context.annotation.Bean;
import org.springframework.context.annotation.Configuration;

@Configuration
public class ApplicationConfig {

    @Bean
    public BookRepository bookRepository() {
        return new BookRepository();
    }

    @Bean
    public BookService bookService() {
        BookService bookService = new BookService();
        bookService.setBookRepository(bookRepository());
        return bookService;
    }

}
@Configuration이라는 애노테이션을 통해서 이 파일은 빈 설정 파일이라는 것을 알려준다. 그리고 @Bean 애노테이션을 사용해 빈으로 등록한다.
@Bean
public BookRepository bookRepository() {
    return new BookRepository();
}
빈으로 등록하는 코드를 보면 빈의 id(bookRepository()), 타입(BookRepository) 그리고 실제 그 객체(new BookRepository())까지 모두 있는 굉장히 유연한 빈 설정이 가능하다.
@Bean
public BookService bookService() {
    BookService bookService = new BookService();
    bookService.setBookRepository(bookRepository());
    return bookService;
}
BookService 같은 경우 Setter가 있었으니까 의존성 주입을 직접 해줄 수 있다. 이 때 의존성 주입에 필요한 메서드를 위 코드처럼 호출해서 가져올 수도 있고, 또는 메서드 파라미터로 주입받을 수도 있다.
@Bean
public BookService bookService(BookRepository bookRepository) {
    BookService bookService = new BookService();
    bookService.setBookRepository(bookRepository);
    return bookService;
}
이렇게 메서드 파라미터로 주입받은 것을 사용해서 주입을 할 수도 있다.
Java 설정 파일로 만든 것은 ApplicationContext로 사용하는 방법을 보자.
package me.gracenam.springapplicationcontext;

import org.springframework.context.ApplicationContext;
import org.springframework.context.annotation.AnnotationConfigApplicationContext;

import java.util.Arrays;

public class DemoApplication {

    public static void main(String[] args) {
        ApplicationContext context = new AnnotationConfigApplicationContext(ApplicationConfig.class);

        String[] beanDefinitionNames = context.getBeanDefinitionNames();
        System.out.println(Arrays.toString(beanDefinitionNames));
        BookService bookService = (BookService) context.getBean("bookService");
        System.out.println(bookService.bookRepository != null);
    }

}
Xml 설정 파일을 사용할 떄는 ClassPathXmlApplicationContext를 사용하여 설정파일을 읽어와 사용했었다.
자바 설정 파일에서는 AnnotationConfigApplicationContext에 설정 파일 클래스(ApplicationConfig.class)를 넘겨주면 이 클래스를 빈 설정으로 사용한다.
처음 Xml 설정 파일을 만들 때 빈을 일일히 등록하다가 Component Scan을 사용해서 보다 간편하게 빈 등록을 할 수 있었다.
자바 설정 파일을 만들 때도 마찬가지로 간단하게 등록하는 방법이 있다. 바로 @ComponentScan 애노테이션이다.
package me.gracenam.springapplicationcontext;

import org.springframework.context.annotation.ComponentScan;
import org.springframework.context.annotation.Configuration;

@Configuration
@ComponentScan
public class ApplicationConfig {

}
@ComponentScan 애노테이션에는 두 가지가 있는데 첫 번째는 basePackages이다. basePackages에는 문자열을 입력해 줘야한다.
@ComponentScan(basePackages = "me.gracenam.springapplicationcontext.")
요즘은 ide가 좋기 때문에 타이핑 없이 쉽게 작성할 수 있다. 하지만 타입세이프티 문제가 있다.
두 번째는 basePackageClasses이다. 이 방법은 조금 더 타입세이프한데 클래스가 위치한 곳, 애플리케이션이 위치한 곳부터 Component Scan을 하기 떄문이다.
@ComponentScan(basePackageClasses = DemoApplication.class)
DemoApplication.class이 위치한 곳부터 모든 클래스에 붙어있는 애노테이션을 찾아서 해당 클래스들을 빈으로 등록하라는 의미이다.
SpringBootApplication
Component Scan을 통해 빈 등록은 쉬워졌는데 ApplicationContext은 매번 만들어야 할까?
물론 이것도 스프링이 알아서 처리해준다. 이것은 부트에서 제공하는 기능이다.
package me.gracenam.springapplicationcontext;

import org.springframework.boot.autoconfigure.SpringBootApplication;

@SpringBootApplication
public class DemoApplication {

    public static void main(String[] args) {

    }

}
@SpringBootApplication 애노테이션 내에 @ComponentScan과 @Configuration이 들어있기 때문에 이렇게 만들 경우 Xml설정 파일과 자바 설정 파일은 필요가 없다.
Reference
Comments
SPRING 의 다른 글
-
스프링 타입 컨터버 24 Jun 2022
-
API 예외 처리 17 Jun 2022
-
예외 처리와 오류 페이지 12 Jun 2022
-
로그인 처리 - 인터셉터 08 Jun 2022
-
로그인 처리 - 필터 06 Jun 2022
-
로그인 처리 - 쿠키, 세션 31 May 2022
-
Bean Validation 22 May 2022
-
검증 22 May 2022
-
메시지, 국제화 21 May 2022
-
타임리프 - 스프링 통합과 폼 19 May 2022
-
타임리프 - 기본 기능 10 May 2022
-
스프링 MVC 기본 기능 - 웹 페이지 만들기 02 May 2022
-
스프링 MVC 기본 기능 - HTTP 응답 30 Apr 2022
-
스프링 MVC 기본 기능 - HTTP 요청 24 Apr 2022
-
스프링 MVC 기본 기능 - 요청 매핑 19 Apr 2022
-
스프링 MVC 기본 기능 19 Apr 2022
-
스프링 MVC 구조 이해 14 Apr 2022
-
MVC 프레임워크 만들기 - V4, V5 12 Apr 2022
-
MVC 프레임워크 만들기 - V1, V2, V3 09 Apr 2022
-
서블릿, JSP, MVC 패턴 05 Apr 2022
-
서블릿 29 Mar 2022
-
웹 애플리케이션 이해 24 Mar 2022
-
스프링 웹 계층이란? 05 Nov 2021
-
스프링 시큐리티 공식문서 번역 27 Sep 2021
-
스프링 AOP 총정리 : 개념, 프록시 기반 AOP, @AOP 27 Apr 2021
-
SpEL (스프링 Expression Language) 25 Apr 2021
-
데이터 바인딩 추상화 : Converter와 Formatter 21 Apr 2021
-
데이터 바인딩 추상화 : PropertyEditor 12 Apr 2021
-
Validation 추상화 10 Apr 2021
-
Resource 추상화 08 Apr 2021
-
IoC 컨테이너 9부 07 Apr 2021
-
IoC 컨테이너 8부 06 Apr 2021
-
IoC 컨테이너 7부 02 Apr 2021
-
IoC 컨테이너 6부 29 Mar 2021
-
IoC 컨테이너 5부 27 Mar 2021
-
IoC 컨테이너 4부 23 Mar 2021
-
IoC 컨테이너 3부 20 Mar 2021
-
IoC 컨테이너 2부 18 Mar 2021
-
IoC 컨테이너 1부 12 Mar 2021
-
스프링 PSA 07 Jan 2021
-
스프링 @AOP 실습 07 Jan 2021
-
프록시 패턴 06 Jan 2021
-
스프링 AOP 04 Jan 2021
-
의존성 주입(Dependency Injection) 04 Jan 2021
-
스프링 빈(Bean) 02 Jan 2021
-
스프링 IoC 컨테이너 01 Jan 2021
-
스프링 IoC 01 Jan 2021
