on
IoC 컨테이너 7부
스프링 프레임워크 핵심기술을 공부하고 정리하는 포스트입니다.
MessageSource
MessageSource는 국제화(i18n) 기능을 제공하는 인터페이스로 쉽게 말해 메세지를 다국화하는 방법이다. 이것 역시 ApplicationContext가 상속받고 있는 기능이다.

MessageSource의 기능을 간단하게 살펴보자.
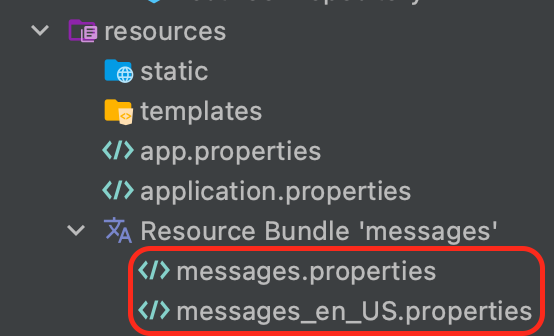
resource 폴더 아래에 2가지 파일을 만들었다. 메세지 설정 파일을 세팅하기 위해서 properties 파일이 필요하다.

이 때 파일의 이름은 [파일이름]_[언어]_[국가].properties와 같은 형식으로 만들어야 한다.
- messages.properties : 기본 메세지, 시스템 언어 및 지역에 맞는 프로퍼티 파일이 존재하지 않을 경우 사용
- messages_en_US : 영어 메세지
- messages_ko_KR : 한글 메세지
▶ messages.properties
greeting=안녕 {0}
▶ messages_en_US.properties
greeting=Hello {0}
이제 출력을 해서 결과를 살펴보자.
package me.gracenam.demospring51;

import org.springframework.beans.factory.annotation.Autowired;
import org.springframework.boot.ApplicationArguments;
import org.springframework.boot.ApplicationRunner;
import org.springframework.context.MessageSource;
import org.springframework.stereotype.Component;

import java.util.Locale;

@Component
public class AppRunner implements ApplicationRunner {

    @Autowired
    MessageSource messageSource;

    @Override
    public void run(ApplicationArguments args) throws Exception {
        System.out.println(messageSource.getMessage("greeting", new String[]{"grace"}, Locale.US));
        System.out.println(messageSource.getMessage("greeting", new String[]{"grace"}, Locale.getDefault()));
    }
}

기본 국가가 한국이기 때문에 default 출력은 한글로 출력되고 영어로 지정해준 것은 영어로 출력된 것을 확인할 수 있다.
이렇게 스프링 부트를 사용한다면 별다른 설정 없이 properties 파일을 사용하여 쉽게 MessageSource를 사용할 수 있다. ResourceBundleMessageSource가 빈으로 등록이 되어있어서 messages라는 번들을 읽고 동작을 하기 때문이다. 부트를 사용하지 않는다면 빈으로 직접 등록을 해주어야 한다.
ReloadableResourceBundleMessageSource
리로딩 기능이 있는 메세지 소스를 활용해보자. ReloadableResourceBundleMessageSource의 객체를 사용해서 메세지 프로퍼티가 갱신되면 바뀐 내용을 읽어올 수 있다.
package me.gracenam.demospring51;

import org.springframework.boot.SpringApplication;
import org.springframework.boot.autoconfigure.SpringBootApplication;
import org.springframework.context.MessageSource;
import org.springframework.context.annotation.Bean;
import org.springframework.context.annotation.PropertySource;
import org.springframework.context.support.ReloadableResourceBundleMessageSource;

@SpringBootApplication
@PropertySource("classpath:/app.properties")
public class Demospring51Application {

    public static void main(String[] args) {
        SpringApplication.run(Demospring51Application.class, args);
    }

    @Bean
    public MessageSource messageSource() {
        var messageSource = new ReloadableResourceBundleMessageSource();
        messageSource.setBasename("classpath:/messages");
        messageSource.setDefaultEncoding("UTF-8");
        messageSource.setCacheSeconds(3);
        return messageSource;
    }
}
package me.gracenam.demospring51;

import org.springframework.beans.factory.annotation.Autowired;
import org.springframework.boot.ApplicationArguments;
import org.springframework.boot.ApplicationRunner;
import org.springframework.context.MessageSource;
import org.springframework.stereotype.Component;

import java.util.Locale;

@Component
public class AppRunner implements ApplicationRunner {

    @Autowired
    MessageSource messageSource;

    @Override
    public void run(ApplicationArguments args) throws Exception {
        while(true) {
            System.out.println(messageSource.getMessage("greeting", new String[]{"grace"}, Locale.US));
            System.out.println(messageSource.getMessage("greeting", new String[]{"grace"}, Locale.getDefault()));
            Thread.sleep(1000l);
        }
    }
}
반복문을 활용해서 메세지 내용이 계속 출력되게 한 후 중간에 properties의 내용을 바꾼 후 빌드해주었다.
▶ messages.properties
greeting=안녕 반갑습니다 {0}

이처럼 파일을 수정하면 수정한 내용이 바로 적용되는 것을 확인할 수 있다.
Reference
Comments
SPRING 의 다른 글
-
스프링 타입 컨터버 24 Jun 2022
-
API 예외 처리 17 Jun 2022
-
예외 처리와 오류 페이지 12 Jun 2022
-
로그인 처리 - 인터셉터 08 Jun 2022
-
로그인 처리 - 필터 06 Jun 2022
-
로그인 처리 - 쿠키, 세션 31 May 2022
-
Bean Validation 22 May 2022
-
검증 22 May 2022
-
메시지, 국제화 21 May 2022
-
타임리프 - 스프링 통합과 폼 19 May 2022
-
타임리프 - 기본 기능 10 May 2022
-
스프링 MVC 기본 기능 - 웹 페이지 만들기 02 May 2022
-
스프링 MVC 기본 기능 - HTTP 응답 30 Apr 2022
-
스프링 MVC 기본 기능 - HTTP 요청 24 Apr 2022
-
스프링 MVC 기본 기능 - 요청 매핑 19 Apr 2022
-
스프링 MVC 기본 기능 19 Apr 2022
-
스프링 MVC 구조 이해 14 Apr 2022
-
MVC 프레임워크 만들기 - V4, V5 12 Apr 2022
-
MVC 프레임워크 만들기 - V1, V2, V3 09 Apr 2022
-
서블릿, JSP, MVC 패턴 05 Apr 2022
-
서블릿 29 Mar 2022
-
웹 애플리케이션 이해 24 Mar 2022
-
스프링 웹 계층이란? 05 Nov 2021
-
스프링 시큐리티 공식문서 번역 27 Sep 2021
-
스프링 AOP 총정리 : 개념, 프록시 기반 AOP, @AOP 27 Apr 2021
-
SpEL (스프링 Expression Language) 25 Apr 2021
-
데이터 바인딩 추상화 : Converter와 Formatter 21 Apr 2021
-
데이터 바인딩 추상화 : PropertyEditor 12 Apr 2021
-
Validation 추상화 10 Apr 2021
-
Resource 추상화 08 Apr 2021
-
IoC 컨테이너 9부 07 Apr 2021
-
IoC 컨테이너 8부 06 Apr 2021
-
IoC 컨테이너 7부 02 Apr 2021
-
IoC 컨테이너 6부 29 Mar 2021
-
IoC 컨테이너 5부 27 Mar 2021
-
IoC 컨테이너 4부 23 Mar 2021
-
IoC 컨테이너 3부 20 Mar 2021
-
IoC 컨테이너 2부 18 Mar 2021
-
IoC 컨테이너 1부 12 Mar 2021
-
스프링 PSA 07 Jan 2021
-
스프링 @AOP 실습 07 Jan 2021
-
프록시 패턴 06 Jan 2021
-
스프링 AOP 04 Jan 2021
-
의존성 주입(Dependency Injection) 04 Jan 2021
-
스프링 빈(Bean) 02 Jan 2021
-
스프링 IoC 컨테이너 01 Jan 2021
-
스프링 IoC 01 Jan 2021
