on
스프링 부트 원리 : 자동 설정
스프링 부트 개념과 활용을 공부하고 정리하는 포스트입니다.
스프링 부트 원리
자동 설정 이해
아래의 코드는 스프링 부트 애플리케이션을 만들었을 때 생성되는 메인 클래스이다.
package me.gracenam;

import org.springframework.boot.SpringApplication;
import org.springframework.boot.autoconfigure.SpringBootApplication;

@SpringBootApplication
public class Application {

    public static void main(String[] args) {
        SpringApplication.run(Application.class, args);
    }

}
애플리케이션을 실행하면 여러가지 설정이 동작하면서 웹 애플리케이션이 나타난다.
이것이 가능한 이유 중 하나가 바로 @SpringBootApplication 애노테이션 내부에 있는 @EnableAutoConfiguration 애노테이션 때문이다.
@SpringBootApplication 애노테이션은 다음과 같이 바꿀 수 있다. @SpringBootApplication은 세 가지의 중요한 애노테이션을 합친 것과 같다.
package me.gracenam;

import org.springframework.boot.SpringApplication;
import org.springframework.boot.SpringBootConfiguration;
import org.springframework.boot.autoconfigure.EnableAutoConfiguration;
import org.springframework.boot.autoconfigure.SpringBootApplication;
import org.springframework.context.annotation.ComponentScan;

// @SpringBootApplication

@SpringBootConfiguration
@ComponentScan
@EnableAutoConfiguration
public class Application {

    public static void main(String[] args) {
        SpringApplication.run(Application.class, args);
    }

}
SpringBootApplication은 빈을 등록하는 과정이 두 단계이다. 한 번은 @ComponentScan으로 등록하고, 그 다음에 @EnableAutoConfiguration으로 읽어온 빈들을 등록한다.
그래서 EnableAutoConfiguration 단계가 없더라도 스프링 부트는 사용할 수 있다.
만약 웹 애플리케이션이 아닌 상태로 실행하고 싶다면 아래와 같이 작성하면 가능하다.
package me.gracenam;

import org.springframework.boot.SpringApplication;
import org.springframework.boot.SpringBootConfiguration;
import org.springframework.boot.WebApplicationType;
import org.springframework.boot.autoconfigure.EnableAutoConfiguration;
import org.springframework.boot.autoconfigure.SpringBootApplication;
import org.springframework.context.annotation.ComponentScan;
import org.springframework.context.annotation.Configuration;

// @SpringBootApplication

@Configuration
@ComponentScan
public class Application {

   public static void main(String[] args) {
       SpringApplication application = new SpringApplication(Application.class);
       application.setWebApplicationType(WebApplicationType.NONE);
       application.run(args);
   }

}
하지만 여기서는 웹 애플리케이션이기 때문에 없이 실행한다면 에러가 발생하게 된다. ServletWeb 설정이 적용되지 않기 때문이다.
@ComponentScan
첫 번째 빈 등록 단계인 @ComponentScan은 @Component라는 애노테이션을 가진 클래스들을 스캔해서 빈으로 등록하는 애노테이션이다.
@ComponentScan은 자기 자신(애노테이션이 달린)을 가진 클래스부터 시작해서 하위 패키지까지 모두 스캔하여 @Component 뿐만 아니라 @Configuration, @Repository, @Service, @Controller, @RestController가 달린 클래스를 찾아서 빈으로 등록한다.
이 때 자기 자신에게 @Configuration과 같은 애노테이션이 붙어 있다면 자신도 빈으로 등록이 된다.
하지만 자기 자신보다 상위에 있는 패키지나 클래스는 읽을 수 없다는 것에 유의해야 한다.
@EnableAutoConfiguration
그렇다면 @EnableAutoConfiguration은 무엇을 어떻게 읽어들이는걸까? 바로 spring meta파일이다.
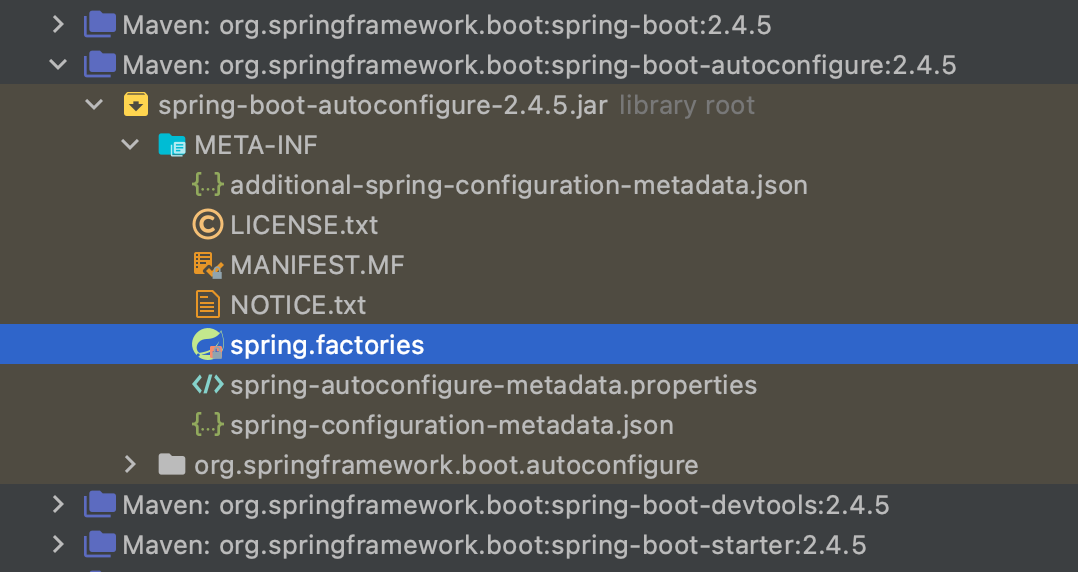
Java resource에 meta 디렉토리 안에 spring.factories라는 파일이 있다.
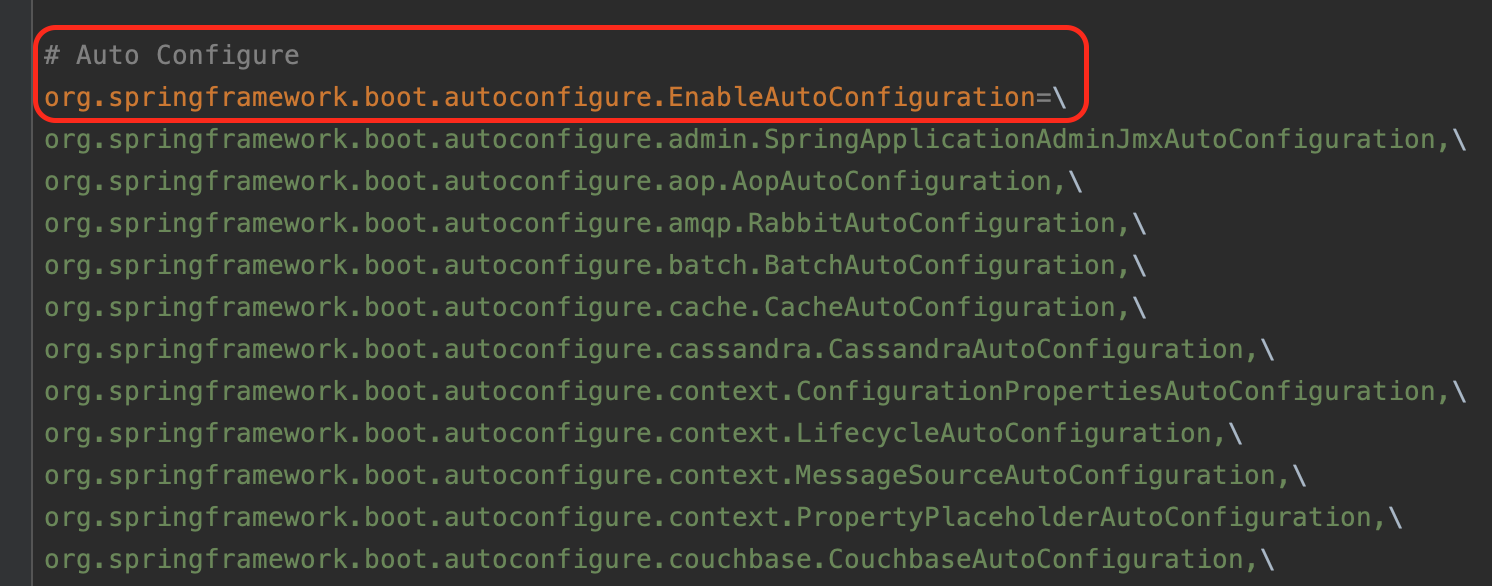
이 파일을 살펴보면 key값으로 org.springframework.boot.autoconfigure.EnableAutoConfiguration이 있고, value로 여러 개의 configuration 파일이 기술되어 있는 것을 볼 수 있다. 이렇게 작성되어 있는 것들이 모두 AutoConfiguration, 기본 설정이다.
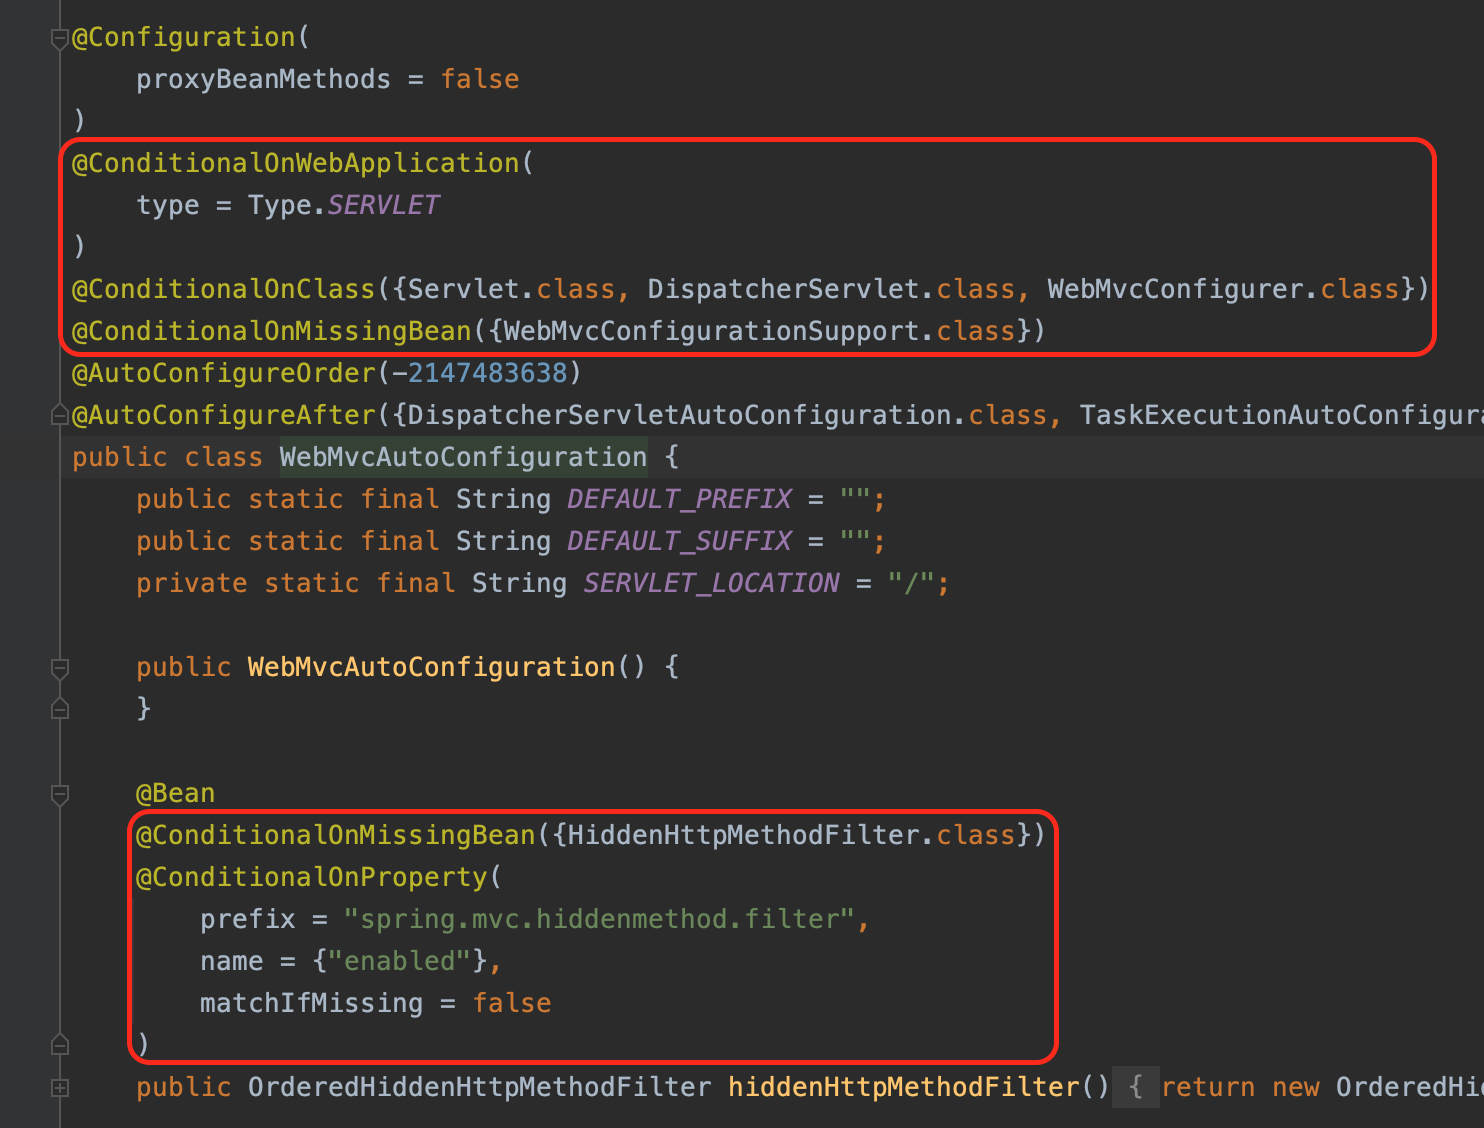
value 값으로 주어진 클래스들은 모두 상단에 @Configuration이 달려있는데, 그 밑에 @ConditionalOnXxxYyyZzz와 같은 애노테이션들이 있다.
바로 이 ConditionalOn~~~ 애노테이션이 조건이 되어서 조건에 따라 빈을 등록하기도 하고 안 하기도 하며, 이 설정파일 자체를 사용 할지 안 할지를 결정하기도 한다.
자동 설정 구현
▶ Starter와 AutoConfigure
AutoConfiguration를 제공할 패키지를 만들어야 되는데 두 가지 프로젝트가 있다.
- Xxx-Spring-Boot-AutoConfigure
- Xxx-Spring-Boot-Starter
AutoConfigure 모듈은 자동 설정을 위한 프로젝트이고, Starter 모듈은 필요한 의존성을 정의하는 프로젝트이다.
만일 둘로 나누지 않고 하나에 만들고 싶다면, 자동 설정을 Starter에 넣어서 Xxx-Spring-Boot-Starter 하나만 만들면 된다.
이제 직접 만들어 보자.
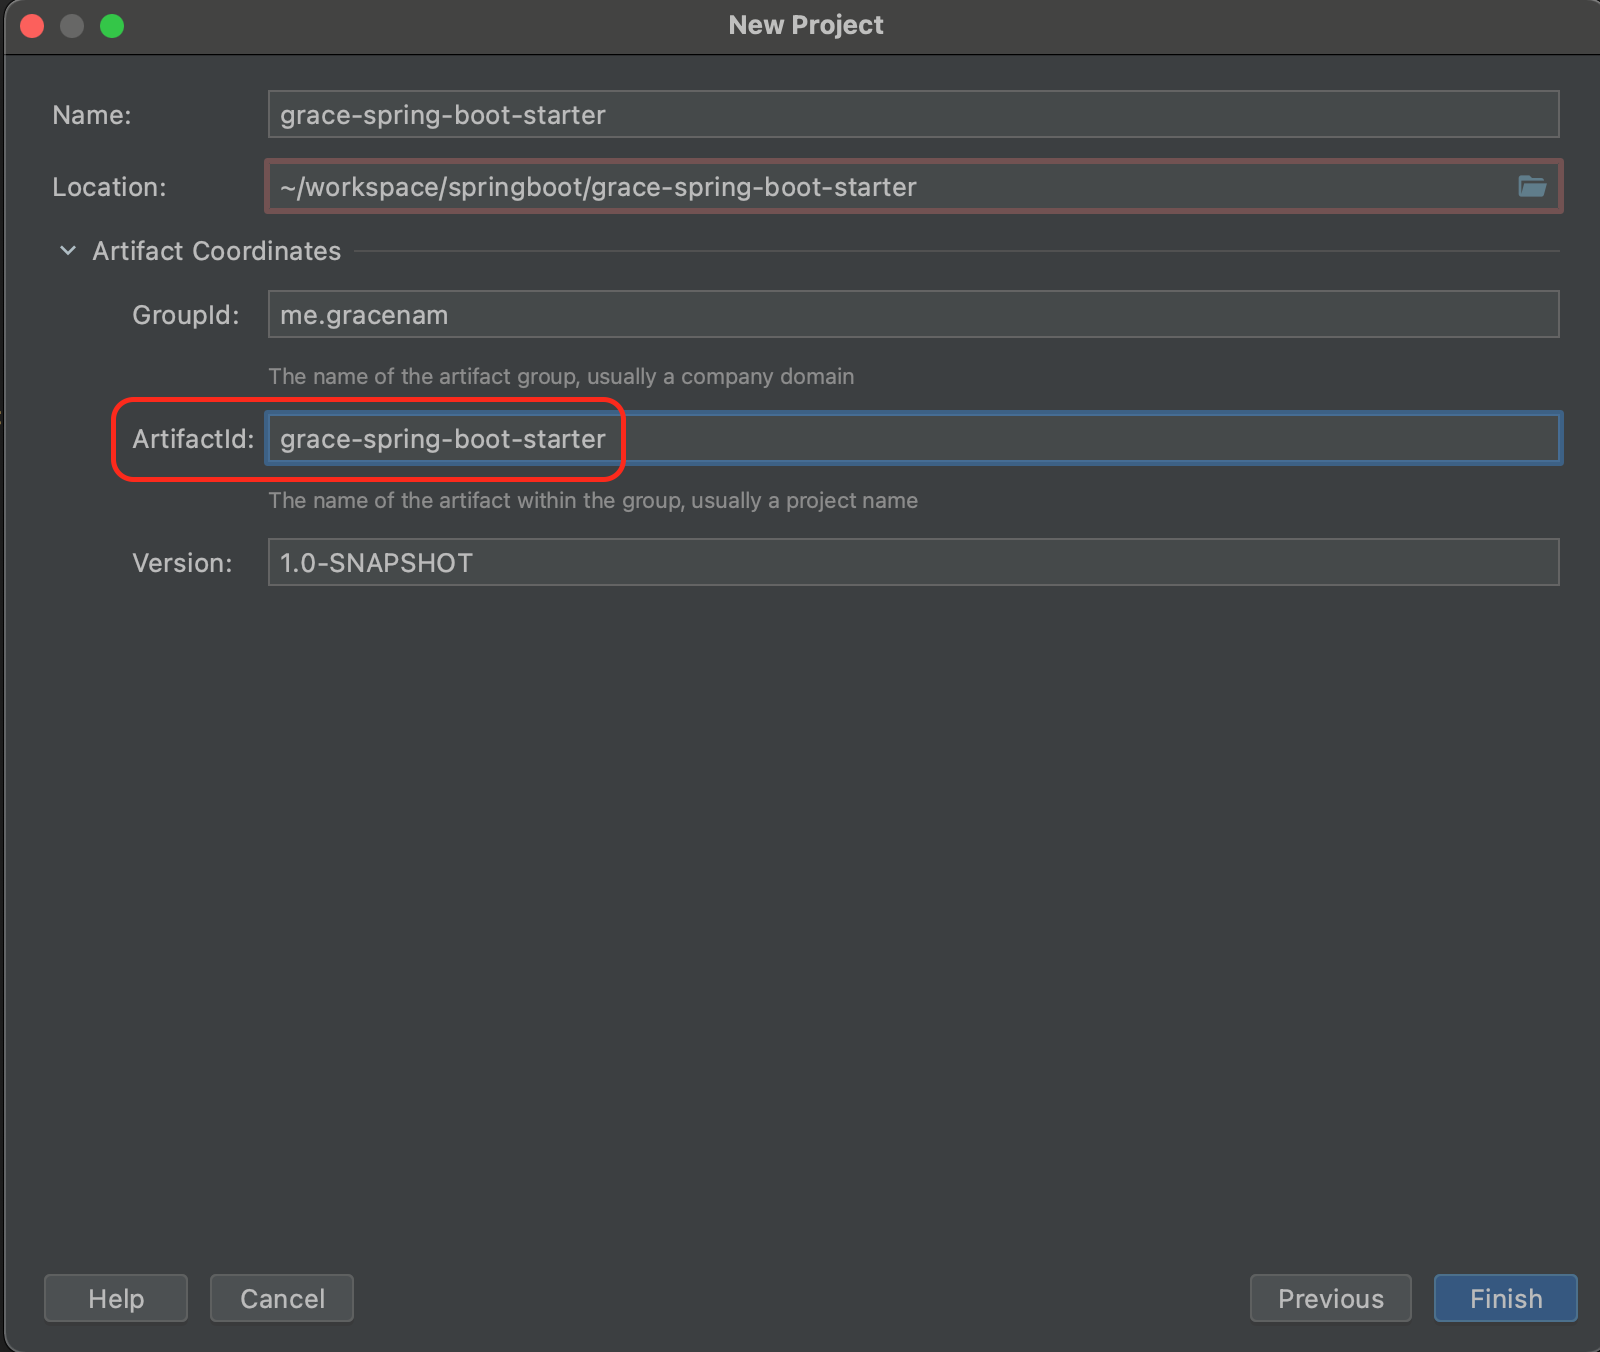
1. 먼저 maven으로 프로젝트를 생성한다. starter 하나로 만들 예정이므로 이름은 Xxx-Spring-Boot-Stater와 같은 형식으로 작성한다.
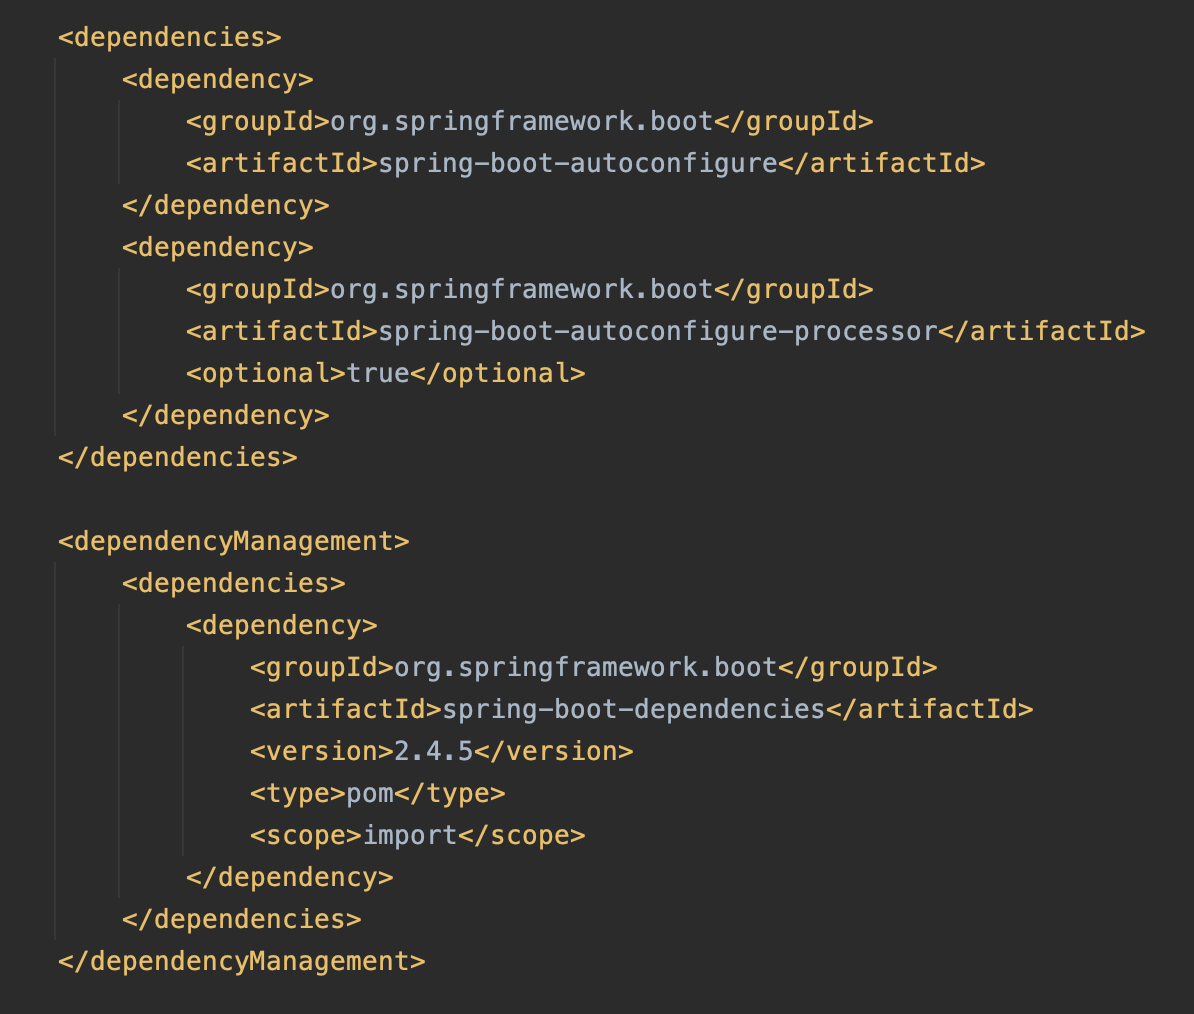
2. 의존성을 추가해준다.
autoconfigure와 autoconfigure-processor라는 의존성을 추가해주었다. 그리고 버전 관리를 위해서 dependencyManagement 영역을 추가했다.
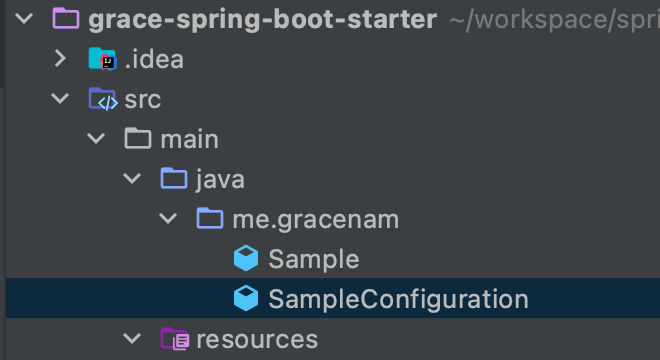
3. 다음과 같이 패키지를 만들고 클래스와 설정파일을 생성한다.
package me.gracenam;

public class Sample {

    String name;

    int howLong;

    public String getName() {
        return name;
    }

    public void setName(String name) {
        this.name = name;
    }

    public int getHowLong() {
        return howLong;
    }

    public void setHowLong(int howLong) {
        this.howLong = howLong;
    }

    @Override
    public String toString() {
        return "Sample{" +
                "name='" + name + '\'' +
                ", howLong=" + howLong +
                '}';
    }

}
package me.gracenam;

import org.springframework.context.annotation.Bean;
import org.springframework.context.annotation.Configuration;

@Configuration
public class SampleConfiguration {

    @Bean
    public Sample sample() {
        Sample sample = new Sample();
        sample.setHowLong(5);
        sample.setName("Text");
        return sample;
    }

}
여기서 클래스는 자동 설정의 대상이 되는 클래스인데, 보통 대상 클래스는 다른 프로젝트에 있는 경우가 흔하지만 여기서는 편의상 같은 프로젝트 내에 생성했다.
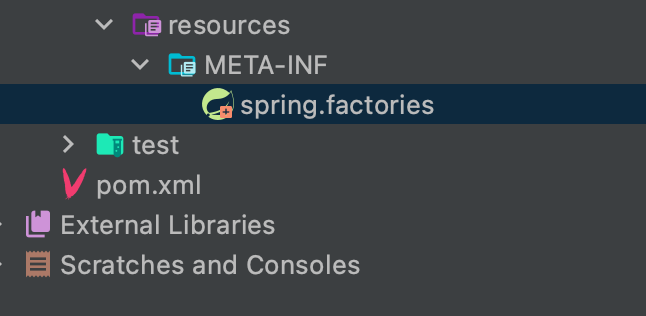
4. resources 아래에 META-INF라는 디렉토리를 만들어준다. 만든 디렉토리 안에 spring.factories라는 파일을 만들고 파일의 내용으로 자동 설정 파일을 추가해준다.
org.springframework.boot.autoconfigure.EnableAutoConfiguration=\
  me.gracenam.SampleConfiguration
5. 다른 프로젝트에서 사용할 수 있도록 이 프로젝트를 build하고 install 해야한다.
maven의 LifeCycle에서 install을 더블 클릭하거나, 콘솔에서 mvn install을 입력하면 된다.
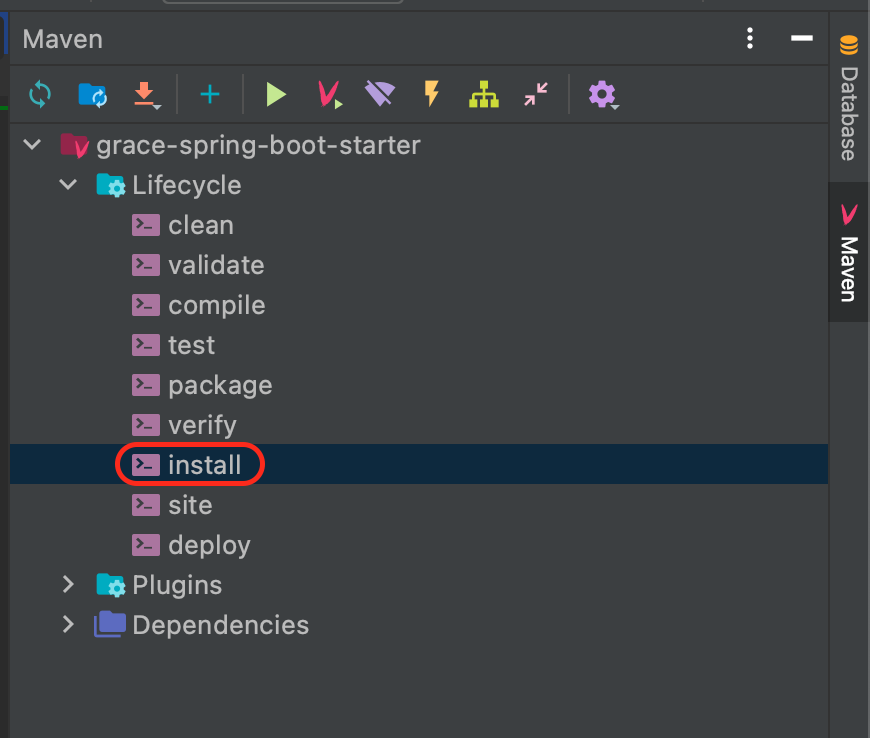
install하면 프로젝트를 build하여 생성된 jar 파일을 다른 maven 프로젝트에서도 가져다 쓸 수 있도록 로컬 maven 저장소에 설치를 한다.
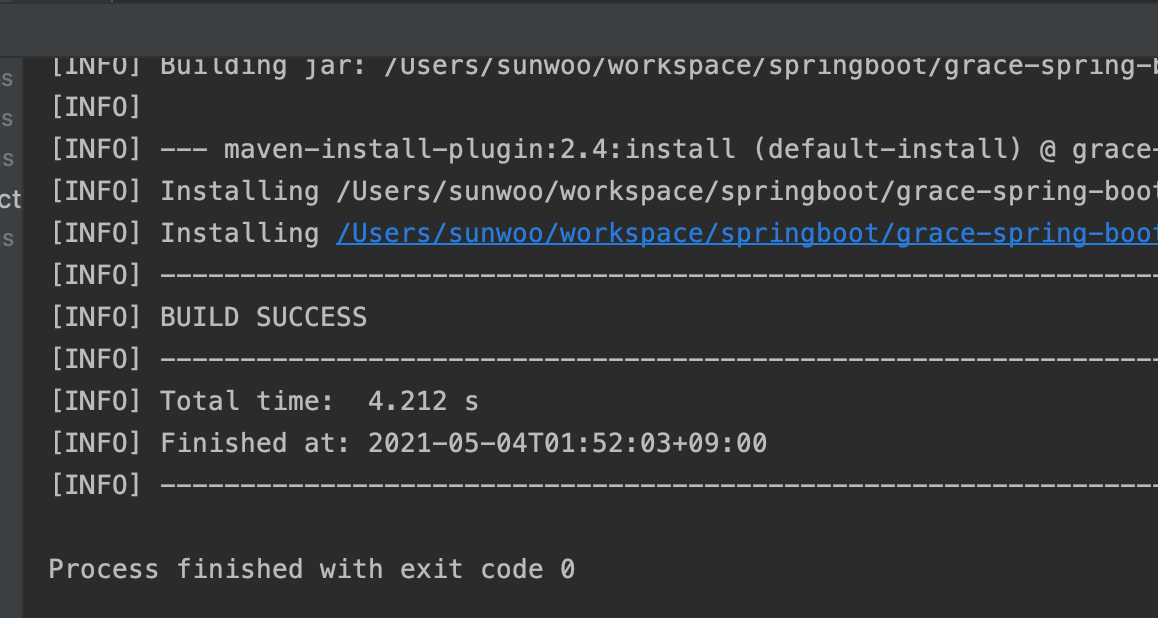
이렇게 만들어진 의존성을 다른 프로젝트에 적용시키려면 pom.xml에서 다음 코드를 복사하여 사용하려는 프로젝트에 의존성 주입을 하면 된다.
<groupId>me.gracenam</groupId>
<artifactId>grace-spring-boot-starter</artifactId>
<version>1.0-SNAPSHOT</version>
이제 프로젝트에 주입된 의존성이 잘 적용되었는지 확인하기 위해서 SampleRunner를 만들어서 출력되는지 확인해보겠다.
package me.gracenam;

import org.springframework.beans.factory.annotation.Autowired;
import org.springframework.boot.ApplicationArguments;
import org.springframework.boot.ApplicationRunner;
import org.springframework.stereotype.Component;

@Component
public class SampleRunner implements ApplicationRunner {

    @Autowired
    Sample sample;

    @Override
    public void run(ApplicationArguments args) throws Exception {
        System.out.println(sample);
    }
}
만일 의존성 주입이 되지 않았다면 빈으로 등록이 되지 않아서 출력이 되지 않을 것이다.

정상적으로 출력이 되는 것을 확인할 수 있다.
▶ @ConditionalOnMissingBean
설정 파일에 있는 빈이 주입되어서 정상적으로 출력되는 것을 확인했는데, 여기에는 한 가지 문제점이 있다.
Application에 Sample 메소드를 만들어서 빈으로 등록해보자.
package me.gracenam;

import org.springframework.boot.SpringApplication;
import org.springframework.boot.WebApplicationType;
import org.springframework.boot.autoconfigure.SpringBootApplication;
import org.springframework.context.annotation.Bean;

@SpringBootApplication
public class Application {

    public static void main(String[] args) {
        SpringApplication application = new SpringApplication(Application.class);
        application.setWebApplicationType(WebApplicationType.NONE);
        application.run(args);
    }

    @Bean
    public Sample sample() {
        Sample sample = new Sample();
        sample.setName("Another");
        sample.setHowLong(100);
        return sample;
    }

}
sample의 이름을 Another로 바꾸고 HowLong을 100으로 변경하였다. 이렇게 한 후에 출력하면 어떤 값이 출력이 될까?

자동설정에 있는 빈이 그대로 출력이 된다! 이유는 스프링 부트에서 빈을 등록할 때 두 가지 과정이 있다고 했는데 ComponentScan으로 빈을 등록하는 과정이 먼저 이루어진다. 그 다음에 AutoConfiguration으로 빈이 등록되면서 ComponentScan으로 등록되었던 빈을 덮어쓴 것이다.
이것을 해결하는 방법은 @ConditionalOnMissingBean을 사용하면 된다. 자동 설정 파일에 있는 빈에 ConditionalOnMissingBean을 추가해주면 이 타입(Sample)의 빈이 없으면 빈으로 등록하게 된다.
package me.gracenam;

import org.springframework.boot.autoconfigure.condition.ConditionalOnMissingBean;
import org.springframework.context.annotation.Bean;
import org.springframework.context.annotation.Configuration;

@Configuration
public class SampleConfiguration {

    @Bean
    @ConditionalOnMissingBean
    public Sample sample() {
        Sample sample = new Sample();
        sample.setHowLong(5);
        sample.setName("Text");
        return sample;
    }

}
즉, Application에 Sample타입의 빈이 있으므로 AutoConfiguration에서는 빈을 등록하지 않게된다.
자동 설정 파일을 다시 install한 후 Application을 refresh하고 실행하면 다음과 같이 결과가 나오는 것을 볼 수 있다.

▶ @ConfigurationProperties
직접 정의한 빈이 우선 시 되어 등록되는 것은 좋지만 문제가 있다. 단순히 값만 바꾸고 싶은데 장황하게 빈 설정을 해야한다는 것이다.
빈 재정의를 하지 않고 심플하게 하고 싶을 때는 application.properties를 활용하여 변경할 수 있다.
sample.name = samplename
sample.how-long = 50
application.properties에 원하는 값을 정의하고 난 후에 이 properties를 사용할 수 있게 해주는 클래스를 자동 설정 프로젝트(starter)에 만들어야 한다.
package me.gracenam;

import org.springframework.boot.context.properties.ConfigurationProperties;

@ConfigurationProperties("sample")
public class SampleProperties {

    private String name;

    private int howLong;

    public String getName() {
        return name;
    }

    public void setName(String name) {
        this.name = name;
    }

    public int getHowLong() {
        return howLong;
    }

    public void setHowLong(int howLong) {
        this.howLong = howLong;
    }
}
이렇게 작성하면 알람이 뜨는데 아래의 의존성을 추가해주면 해결이 된다.
<dependency>
  <groupId>org.springframework.boot</groupId>
  <artifactId>spring-boot-configuration-processor</artifactId>
</dependency>
이제 Application에서 빈을 정의하지 않고 실행하게 되면 ComponentScan으로 등록되는 빈이 없기 때문에 AutoConfiguration으로 빈을 등록하게 되고 이 때, properties를 참조해서 값을 가져오도록 만든다.
package me.gracenam;

import org.springframework.boot.autoconfigure.condition.ConditionalOnMissingBean;
import org.springframework.boot.context.properties.EnableConfigurationProperties;
import org.springframework.context.annotation.Bean;
import org.springframework.context.annotation.Configuration;

@Configuration
@EnableConfigurationProperties(SampleProperties.class)
public class SampleConfiguration {

    @Bean
    @ConditionalOnMissingBean
    public Sample sample(SampleProperties properties) {
        Sample sample = new Sample();
        sample.setHowLong(properties.getHowLong());
        sample.setName(properties.getName());
        return sample;
    }

}
이렇게 하면 AutoConfiguration은 application.properties에서 값을 가져와서 빈을 등록하게 된다. 자동설정 프로젝트를 install한 다음(install을 해야 로컬에 있는 jar 파일이 변경된다!) Application을 실행하면 결과를 확인할 수 있다.

Reference
Comments
SPRING BOOT 의 다른 글
-
스프링 부트 활용 : 스프링 데이터 4부 17 Sep 2021
-
스프링 부트 활용 : 스프링 데이터 3부 16 Sep 2021
-
스프링 부트 활용 : 스프링 데이터 2부 15 Sep 2021
-
스프링 부트 활용 : 스프링 데이터 1부 14 Sep 2021
-
스프링 부트 활용 : 스프링 웹 MVC 11부 13 Sep 2021
-
스프링 부트 활용 : 스프링 웹 MVC 10부 10 Sep 2021
-
스프링 부트 활용 : 스프링 웹 MVC 9부 09 Sep 2021
-
스프링 부트 활용 : 스프링 웹 MVC 8부 08 Sep 2021
-
스프링 부트 활용 : 스프링 웹 MVC 7부 03 Sep 2021
-
스프링 부트 활용 : 스프링 웹 MVC 6부 05 Aug 2021
-
스프링 부트 활용 : 스프링 웹 MVC 5부 27 Jun 2021
-
스프링 부트 활용 : 스프링 웹 MVC 4부 13 Jun 2021
-
스프링 부트 활용 : 스프링 웹 MVC 3부 06 Jun 2021
-
스프링 부트 활용 : 스프링 웹 MVC 2부 05 Jun 2021
-
스프링 부트 활용 : 스프링 웹 MVC 1부 30 May 2021
-
스프링 부트 활용 : Spring-Boot-Devtools 30 May 2021
-
스프링 부트 활용 : 테스트 26 May 2021
-
스프링 부트 활용 : 로깅 2부 25 May 2021
-
스프링 부트 활용 : 로깅 1부 23 May 2021
-
스프링 부트 활용 : 프로파일 23 May 2021
-
스프링 부트 활용 : 외부 설정 2부 21 May 2021
-
스프링 부트 활용 : 외부 설정 1부 15 May 2021
-
스프링 부트 활용 : SpringApplication 11 May 2021
-
스프링 부트 원리 : 정리 06 May 2021
-
스프링 부트 원리 : 독립적으로 실행 가능한 JAR 06 May 2021
-
스프링 부트 원리 : 내장 웹 서버 04 May 2021
-
스프링 부트 원리 : 자동 설정 02 May 2021
-
스프링 부트 원리 : 의존성 01 May 2021
-
스프링 부트 시작하기 01 May 2021
